Creating API with Go using MVC & Service Layer Pattern
Introduction
Hello! I hope you have a good day.
This article will be a tutorial kind of article that you might wanted to follow through step by step. We will be making a Restful API using Go, we will be also using library such as Gin & Gorm. The service we will be building are basic CRUD services so we don’t have to bother about any other complex mechanism. Before we start building the service you might wanted to get some tools up and running :
Go / Golang
In this tutorial I am using Go 1.17 using any lower version should not be an issue since we will be only dealing with basic services.
MySQL / PostgreSQL
This is by your choice, any of it will do just fine. As for me I am using PostgreSQL.
IDE
Again! this will be up 2 u, Visual Studio Code is good enough for every day use. But if you got the access I would recommend using GoLand. If you are a student you could actually get a free one year JetBrains Subscription from the GitHub Education program check more here :
Concepts
About MVC
Some of you clicking this article might be already know what MVC is hence it is a really common pattern that used in development. Regardless, here is a little overview of what is MVC.
Model-View-Controller, commonly referred to as MVC, is a pattern used to help organize and structure code. Specifically, most code will be classified as a model, view, or controller.
From calhoun.io - Using MVC to Structure Go Web Applications
The quote above describe nicely what MVC is, in MVC we separate our code into 3 main Concerns :
Model
In model we handle all the data related logic that users work with, This typically means communicating with the database. an example will be we have a service that register our users who signup and interacts with our website in certain way. In the Model we will make a type User struct {...} that will help us to map the data in database with our application. This will also help us to query create, update, delete from our databases.
In our application we will use Gorm that will help us creating the Models and also interacting with databases.
View
View are responsible with handling rendering and displaying data, usually view are handle a page such as HTML. In the real scenario language and framework will have different way handling views. And in MVC using view are optional this will suit our use case on making an API since we will not have any view.
Controller
Controller is the middleman, it act as an interface between Model and View Components. it will accept the incoming request, get the data from model, and prepare the data for the views. It sounds neat and easy to do on paper but on the reality controller usually became really coupled since there are so many business logic that are done inside the controller this happen because not only we put flow of business inside the controller, we also make the controller interact directly with the Models, in some cases the model will query the data and the process is done.
But in a complex business logic there might be multiple query that needs to be done and there are also post-processing after data from the model are acquired. To solve this issue we will introduce the concept of Service Layer Pattern that will be discussed in greater detail in next section.
About Service Layer Pattern
Service Layer Pattern are originally taken from Patterns of Enterprise Application Architecture by Martin Fowler, with Dave Rice, Matthew Foemmel, Edward Hieatt, Robert Mee, and Randy Stafford.
Defines an application’s boundary with a layer of services that establishes a set of available operations and coordinates the application’s response in each operation.
A Service Layer defines an application’s boundary [Cockburn PloP] and its set of available operations from the perspective of interfacing client layers. It encapsulates the application’s business logic, controlling transactions and coor-dinating responses in the implementation of its operations.
Taken From - https://martinfowler.com/eaaCatalog/serviceLayer.html
Simply what service layer does is encapsulate common logic or interaction into a ‘service’, so that the logic can be easily accessed across multiple business logic and it will also reduce duplication. Example :
Without using service layer pattern, you might write all your code & logic in the controller starting from getting data from the database, till creating the loops to add the required attributes, this will led to coupling and duplication problems. But using service layer pattern we could encapsulate our logic into smaller parts and make it easily reusable.
The Project
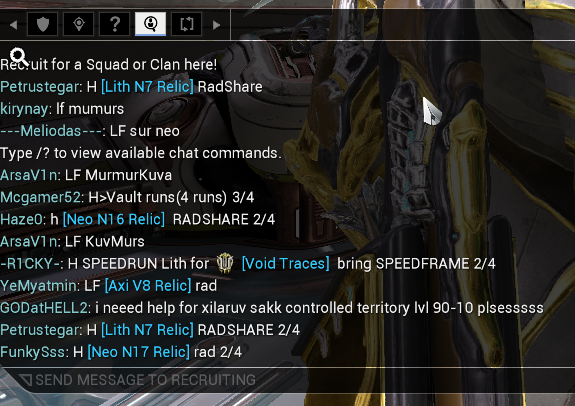
Can’t lie it is pretty boring when it came to creating a common API like Todo List, Animal Database, Sales, Schools, you name it. So to avoid that in this project we will be making MMORPG matchmaking API. The case: in MMORPG it is really common to see player that are looking for ‘Hunting Parties’ to do quest or fight bosses together. If you ever played one and tries to look for a parties it is a really tedious job. You need to constantly post what are you looking for and you also need to keep an eye on the little chat bar so you don’t miss any of the opportunities, sometimes you might just ended up wasting time and having a headache looking at the chat bar.
To solve this issue, I think that a dedicated matchmaking sites will do the job well. In this project we will create a basic setup of our Matchmaking API.
Step 0 - Setting Up The Directory
In this step we will be setting up our directory, this directory will be equivalent to package. I will be plotting our code into per function group simply we will group controller with controller and model with models. here is what it looks like :
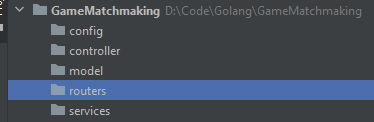
First there are the main part: Controller & Model this 2 part we took from the original MVC, but notice here that we don’t have any views. Also there is services directory that will be used to put our services, there are 2 other directory which the config and the routers, in config we will be placing our application config such as database information or maybe application versioning, in routers we will be placing our endpoints if you think about it routers seems like an alternative of view since view = return / render data & router = return data.
Using MVC does not mean that you need to strictly only have Models, View, and Controller in the end MVC is just an architectural pattern that supposed to help you shape your programs you can modify it to suite your needs but still there are some common and best practices exists that you might wanted to consider.
To dig deeper about how you should structure a MVC application, checkout [1] in the references section.
Step 1 - Preparing & Installing Modules
We will be installing the modules using Go Modules, to initiate the project go to your root project directory and type:
go mod init github.com/<your_github_name>/game-matchmaking
This will initiate our go module, next is to install the dependencies:
go get -u github.com/gin-gonic/gin
go get -u gorm.io/gorm
After installing these 2 modules your go.mod file should look something like this:
module github.com/arifluthfi16/game-matchmaking

go 1.17

require (
	github.com/gin-contrib/sse v0.1.0 // indirect
	github.com/gin-gonic/gin v1.7.4 // indirect
	github.com/go-playground/locales v0.14.0 // indirect
	github.com/go-playground/universal-translator v0.18.0 // indirect
	github.com/go-playground/validator/v10 v10.9.0 // indirect
	github.com/golang/protobuf v1.5.2 // indirect
	github.com/jinzhu/inflection v1.0.0 // indirect
	github.com/jinzhu/now v1.1.2 // indirect
	github.com/json-iterator/go v1.1.12 // indirect
	github.com/leodido/go-urn v1.2.1 // indirect
	github.com/mattn/go-isatty v0.0.14 // indirect
	github.com/modern-go/concurrent v0.0.0-20180306012644-bacd9c7ef1dd // indirect
	github.com/modern-go/reflect2 v1.0.2 // indirect
	github.com/ugorji/go/codec v1.2.6 // indirect
	golang.org/x/crypto v0.0.0-20210711020723-a769d52b0f97 // indirect
	golang.org/x/sys v0.0.0-20210806184541-e5e7981a1069 // indirect
	golang.org/x/text v0.3.6 // indirect
	google.golang.org/protobuf v1.27.1 // indirect
	gopkg.in/yaml.v2 v2.4.0 // indirect
	gorm.io/gorm v1.21.16 // indirect
)
For now our modules installation is completed, the final step that you need to do is to push the project to your github this step is optional but it is recommended, you could learn how to push your project into github from here : https://docs.github.com/en/github/importing-your-projects-to-github/importing-source-code-to-github/adding-an-existing-project-to-github-using-the-command-line
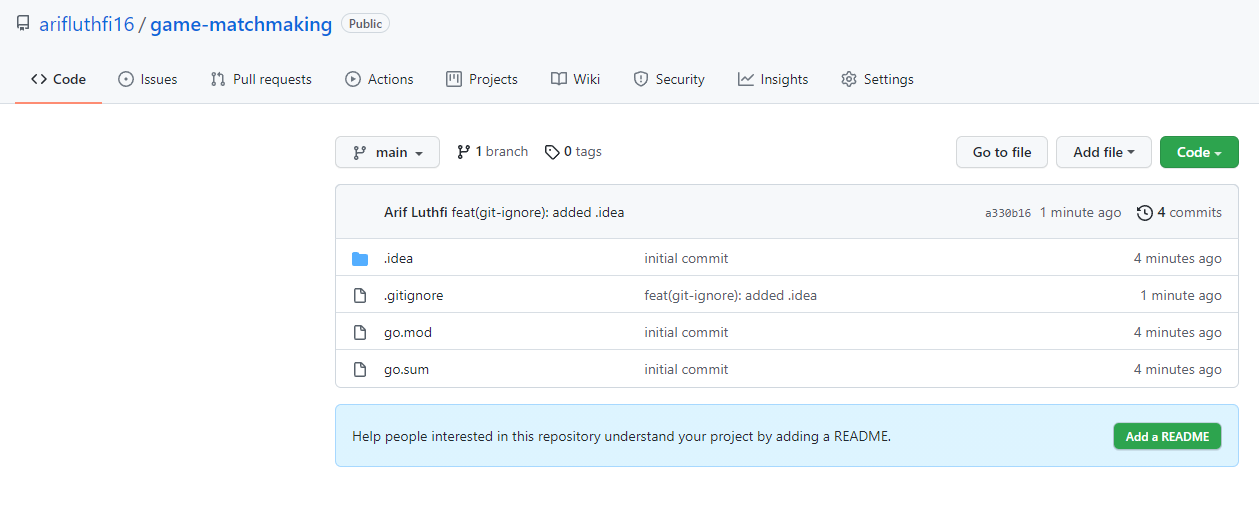
After you finished pushing your project into github, it should have look something like this:
Step 2 - Setup Models & Databases
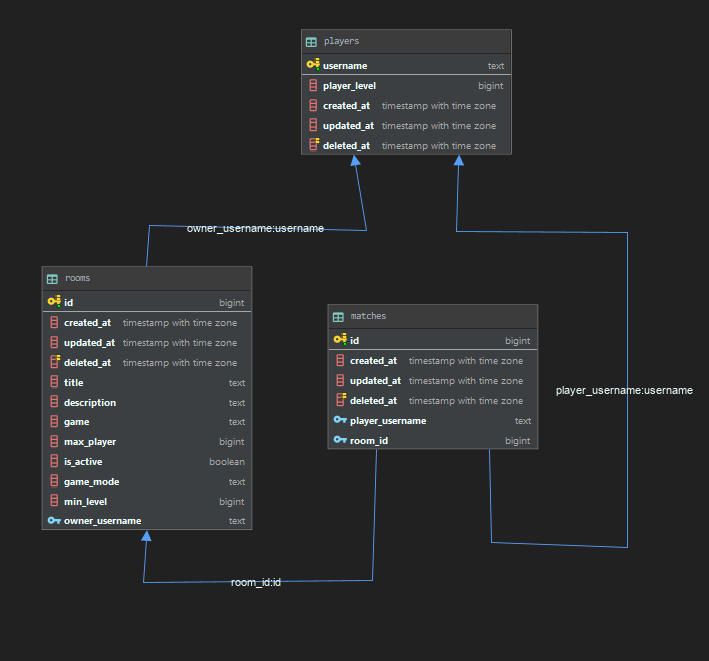
Before we dive in creating the models using GORM, first we need to analyze and create a requirement for the system / feature that we are going to create. In this case we will be making the room system where user could create, join, and search a room. The party room will have certain limitation such as maximum number of players and minimum level. To track which player that inside the room we need a N-N relation, we will call the relation as ‘match’. With that in mind here is the schema that we will be working with :
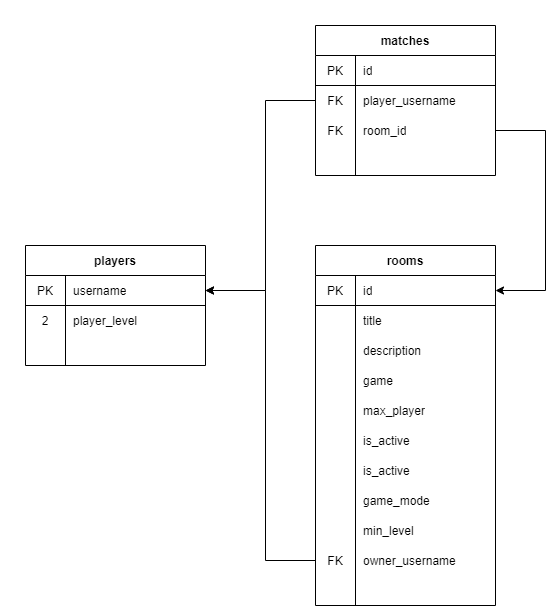
From the schema above, we will be creating our models. we will be creating 3 models :
Creating Models
/model/player.go
package model

import (
	"gorm.io/gorm"
	"time"
)

type Player struct {
	Username	string			`gorm:"primaryKey;"`
	PlayerLevel	int
	CreatedAt 	time.Time
	UpdatedAt 	time.Time
	DeletedAt 	gorm.DeletedAt 	`gorm:"index"`
	Matches		[]Match			`gorm:"foreignKey:PlayerUsername"`
	Room		Room			`gorm:"foreignKey:OwnerUsername"`
}
/model/room.go
package model

import (
	"database/sql"
	"gorm.io/gorm"
)

type Room struct {
	gorm.Model
	Title 			string
	Description 	sql.NullString
	Game			string
	MaxPlayer 		int
	IsActive 		bool
	GameMode		string
	MinLevel		int
	Matches			[]Match			`gorm:"foreignKey:RoomID"`
	OwnerUsername	string
}
/model/match.go
package model

import (
	"gorm.io/gorm"
)

type Match struct {
	gorm.Model
	PlayerUsername	string
	RoomID			string
}
Setting up Connections & Migration
After we finished creating the models, the next step is to create a database connection and execute the migration. To create a service that handle database connections we will be using dependency injection this will make us easier to work with dependencies and also testing later. Here is an amazing article by Alex Edwards on managing databases connection using dependency injection.
Testing Gorm
First of all in the root directory create /main.go
package main

import (
	"fmt"
	"gorm.io/gorm"
)

type Server struct {
	db *gorm.DB
}

func main(){
	fmt.Println("Gorm Is Installed")
}
Then simply go to your console and type
go run main.go
If there is no error in the console, then it means your GORM is installed and you are ready to go.
Preparing Model Registry
Create a file /model/index.go
package model

type Model struct {
	Model interface{}
}

func RegisterModels() []Model {
	return []Model{
		{Model: Room{}},
		{Model: Player{}},
		{Model: Match{}},
	}
}
In this model registry, we created a central point where we can access all the models. This will help us later on when doing migration.
Preparing Database Service
In this service we will be creating our config, create connection, and also migration scripts.
create a file called /services/db/db.go
package db

import (
	"fmt"
	"github.com/arifluthfi16/game-matchmaking/model"
	"gorm.io/driver/postgres"
	"gorm.io/gorm"
	"log"
)

type DBConfig struct {
	DBHost string
	DBUser string
	DBName string
	DBPort string
	DbPass string
}

func LoadDB(config DBConfig) *gorm.DB {
	var err error
	conStr := fmt.Sprintf(
		"host=%s user=%s password=%s dbname=%s port=%s sslmode=disable TimeZone=Asia/Jakarta",
		config.DBHost, config.DBUser, config.DbPass, config.DBName, config.DBPort,
	)
	db, err := gorm.Open(postgres.Open(conStr), &gorm.Config{})
	if err != nil {
		log.Fatal(err.Error())
	}
	fmt.Println("!! Database Connection Loaded !!")
	return db
}

func DBMigrate (db *gorm.DB){
	var err error
	for _,model := range model.RegisterModels(){
		err = db.Debug().AutoMigrate(model.Model)
		if err != nil {
			log.Fatal(err)
		}
	}
	fmt.Println("!! Database Migration Succeed !!")
}
In this file we created a service that covers variety of database action:
- We created
DBConfigstruct to make easier parameter passing later - We created
LoadDB()that return*gorm.DBthis function will help us to create connection to the databases. - Finally we create
DBMigratethat accepts a database instance this function will be used later to execute migration. in this function we called ourmodel.RegisterModels()we created earlier that will return an array of model to be processed down the migration.
Using The Connections
Back to our /main.go file, we will be adding the services to the main function.
package main

import (
	"github.com/arifluthfi16/game-matchmaking/services/db"
	"gorm.io/gorm"
)

type Server struct {
	db *gorm.DB
}

func main(){
	DBConfig := services.DBConfig{
		DBHost: "localhost",
		DBUser: "postgres",
		DBName: "game_matchmaking",
		DBPort: "5432",
		DbPass: "<<your db pass>>",
	}
	app := Server{db: services.LoadDB(DBConfig)}
	services.DBMigrate(app.db)
}
In this file, firstly we created a database config using the services.DBConfig you can make this extra safe by using .env if you wanted to. Then we created an instance of Server and assigning db with services.LoadDB(). This way we have our database connection established.
To run our migration simply call services.DBMigrate() and pass our app.db as parameters. if you see
...
!! Database Migration Succeed !!
Then it means that you successfully connected to database and your migration is successfully executed!
Please note that you do not have to run the migration every time you start the server. after running the migration I commented the code so it will not run later until it needed. for the sake of simplicity this will be enough for now.
Here is the visualization of the successful migration!
After we got our data setup ready, next step will be making the actual business process and services. Before continuing let’s create a checkpoint here by committing & pushing it to the GitHub repo.
git add .
git commit -m "feat(db): established database model, connection & migration"
git push origin main
I follow Angular Contributing Guide to struct the commit message. and for the sake of this project we will not be creating any branch.
Step 3 - Creating Services
First we need to define what business process that we wanted to create here, this project we will limit our business process to :
- Create a player
- Create a room
- Other player can join room
- Room owner can create minimum level limitation.
Please note here that we will not implement any authentication module so for now we will pass the literal player username when doing a request.
Creating Player Services
In player service we will be making 2 files:
services/player/index.go
package player

import (
	"gorm.io/gorm"
)

type PlayerService struct {
	DB *gorm.DB
}
The index will be used to put the basic struct and other struct definition.
services/player/create.go
package player

import (
	"github.com/arifluthfi16/game-matchmaking/model"
)

func (s PlayerService) CreateOne (username string) (model.Player, error) {
	player := model.Player{
		Username:    username,
		PlayerLevel: 1,
	}

	if err := s.DB.Create(&player).Error; err != nil {
		return player, err
	}
	return player, nil
}
In the create module is where we will put all creational function, like create one, create many, or other that have similar function like maybe create bulk or create by provided certain parameters.
Creating Room Services
Same as the player service, we will be creating index.go first
services/room/index.go
package room

import (
	"gorm.io/gorm"
)

type RoomService struct {
	DB *gorm.DB
}
services/room/create.go
package room

import (
   "database/sql"
   "github.com/arifluthfi16/game-matchmaking/model"
)

func (s RoomService) CreateOne (ownerUsername string, title string, description string) (model.Room, error) {
   room := model.Room{
      Title:         title,
      Description:   sql.NullString{
         String: description,
      },
      Game:          "Warframe",
      MaxPlayer:     4,
      IsActive:      true,
      GameMode:      "Normal",
      MinLevel:      1,
      OwnerUsername: ownerUsername,
   }

   if err := s.DB.Create(&room).Error; err != nil {
      return room, err
   }
   return room, nil
}
In general this script is quite the same with the creational script before, so you should be fine.
Creating Match Services
In this service we will be creating 3 files, and same as before we will be starting on the index.
/services/match/index.go
package match

import (
	"gorm.io/gorm"
)

type MatchService struct {
	DB *gorm.DB
}
services/match/create.go
package match

import (
	"github.com/arifluthfi16/game-matchmaking/model"
)

func (s MatchService) PlayerJoinRoom (username string, roomID uint) (model.Match, error){
	match := model.Match{
		PlayerUsername: username,
		RoomID:         roomID,
	}
	if err := s.DB.Create(&match).Error; err != nil {
		return match, err
	}
	return match, nil
}
services/match/find.go
package match

import (
	"github.com/arifluthfi16/game-matchmaking/model"
)

func (s MatchService) FindAll () ([]model.Match, error) {
	var matches []model.Match
	result := s.DB.Find(&matches)
	return matches, result.Error
}

func (s MatchService) FindUserInRoom (username string, roomID uint) (model.Match, error) {
	var match model.Match
	result := s.DB.Where(&model.Match{
		PlayerUsername: username,
		RoomID:         roomID,
	})
	return match, result.Error
}
finally a find services, the name explains itself. in this service we create modules to find data. after all the services we need is completed next step will be mapping it to our controller and routers. Do not forget to push your services updated to your github repo.
Step 4 - Mapping the Controller
In part we will be mapping our services to the business process. but first we will be creating a template for our error and success response.
Responses
controller/response.go
package controller

type ErrorResponse struct {
	Msg string
	Err error
}

type SuccessResponse struct {
	Status		bool	`json:"status"`
	Msg 		string 	`json:"msg"`
}
This will be used as a formatter for our error and success API response.
Player Controller
controller/player.go
package controller

import (
	"fmt"
	"github.com/arifluthfi16/game-matchmaking/services"
	"github.com/gin-gonic/gin"
	"net/http"
)

type PlayerController struct {}

type createPlayerInput struct {
	Username string `json:"username" binding:"required"`
}

func (controller PlayerController) CreatePlayer(c *gin.Context) {
	var input createPlayerInput
	if err := c.ShouldBindJSON(&input); err != nil {
		var response = ErrorResponse{
			Msg: "Validation Error",
			Err: err,
		}
		c.AbortWithStatusJSON(http.StatusOK, response)
		return
	}

	player, err := services.PlayerService.CreateOne(input.Username)
	if  err != nil {
		var response = ErrorResponse{
			Msg: "Failed to Create Player",
			Err: err,
		}
		c.AbortWithStatusJSON(http.StatusOK, response)
		return
	}

	var responseString = fmt.Sprintf("Successfully created a new player with username : %s", player.Username)
	var response = SuccessResponse{
		Status: true,
		Msg:    responseString,
	}
	c.AbortWithStatusJSON(http.StatusOK, response)
}
Explanation:
package controller

import (
	"fmt"
	"github.com/arifluthfi16/game-matchmaking/services"
	"github.com/gin-gonic/gin"
	"net/http"
)

type PlayerController struct {}
var playerService = services.PlayerService
In in this part we called some dependencies, and also the service that we created earlier. We also wrap our player service into playerService variable.
type createPlayerInput struct {
	Username string `json:"username" binding:"required"`
}
in this part we define our input structure that will be used when users send request via our endpoint later.
func (controller PlayerController) CreatePlayer(c *gin.Context) {
	var input createPlayerInput
	if err := c.ShouldBindJSON(&input); err != nil {
		var response = ErrorResponse{
			Msg: "Validation Error",
			Err: err,
		}
		c.AbortWithStatusJSON(http.StatusOK, response)
		return
	}

	player, err := services.PlayerService.CreateOne(input.Username)
	if  err != nil {
		var response = ErrorResponse{
			Msg: "Failed to Create Player",
			Err: err,
		}
		c.AbortWithStatusJSON(http.StatusOK, response)
		return
	}

	var responseString = fmt.Sprintf("Successfully created a new player with username : %s", player.Username)
	var response = SuccessResponse{
		Status: true,
		Msg:    responseString,
	}
	c.AbortWithStatusJSON(http.StatusOK, response)
}
Finally the controller itself! here we handle our input, input validation, the player creation, and response management. Whoa that is one long module, just a little bit more!
Room Controller
controller/room.go
package controller

import (
	"fmt"
	"github.com/arifluthfi16/game-matchmaking/services"
	"github.com/gin-gonic/gin"
	"net/http"
)

type RoomController struct {}

type createRoomInput struct {
	OwnerUsername	string	`json:"owner_username"`
	Title			string	`json:"title"`
	Description		string	`json:"description"`
}

func (controller RoomController) CreateRoom (c *gin.Context) {
	// * Input Validation
	var input createRoomInput
	if err := c.ShouldBindJSON(&input); err != nil {
		var response = ErrorResponse{
			Msg: "Validation Error",
			Err: err,
		}
		c.AbortWithStatusJSON(http.StatusOK, response)
		return
	}

	// * Create Room into DB
	room, err := services.RoomService.CreateOne(input.OwnerUsername, input.Title, input.Description)
	if  err != nil {
		var response = ErrorResponse{
			Msg: "Failed to Create Player",
			Err: err,
		}
		c.AbortWithStatusJSON(http.StatusOK, response)
		return
	}

	// * Success Response
	var responseString = fmt.Sprintf("Successfully created a new room with owner : %s", room.OwnerUsername)
	var response = SuccessResponse{
		Status: true,
		Msg:    responseString,
	}
	c.AbortWithStatusJSON(http.StatusOK, response)
}
Match Controller
controller/match.go
package controller

import (
	"fmt"
	"github.com/arifluthfi16/game-matchmaking/services"
	"github.com/gin-gonic/gin"
	"net/http"
)

type MatchController struct {}

type createMatchInput struct {
	Username 	string 	`json:"username" binding:"required"`
	RoomID		int		`json:"room_id" binding:"required"`
}

func (controller MatchController) JoinMatch (c *gin.Context) {
	// * Input Validation
	var input createMatchInput
	if err := c.ShouldBindJSON(&input); err != nil {
		var response = ErrorResponse{
			Msg: "Validation Error",
			Err: err,
		}
		c.AbortWithStatusJSON(http.StatusOK, response)
		return
	}

	// * PLayer Join Room
	isPlayerJoined, err := services.MatchService.FindUserInRoom(input.Username, uint(input.RoomID))
	if  err != nil {
		var response = ErrorResponse{
			Msg: "Failed to check player",
			Err: err,
		}
		c.AbortWithStatusJSON(http.StatusOK, response)
		return
	}

	fmt.Println(isPlayerJoined)
	match, err := services.MatchService.PlayerJoinRoom(input.Username, uint(input.RoomID))
	if  err != nil {
		var response = ErrorResponse{
			Msg: "Failed to Create Player",
			Err: err,
		}
		c.AbortWithStatusJSON(http.StatusOK, response)
		return
	}

	var responseString = fmt.Sprintf("Successfully joined room %s", string(match.RoomID))
	var response = SuccessResponse{
		Status: true,
		Msg:    responseString,
	}
	c.AbortWithStatusJSON(http.StatusOK, response)
}
With this done our controller are completed and the final step is just to setup our router.
Step 5 - Router & More Server Setup
if you are not already created a routers folder, create one. The first we will be creating our base route grouping: Player, Room, & Match that extends a certain interfaces. Then we will create a route loader to load all the routes.
Route Groups
Before creating the route groups, we need to create an interface for our route group to extends.
routers/index.go
package routers

import "github.com/gin-gonic/gin"

type RouterInterface interface {
	Route(*gin.Engine)
}
We create the RouterInterface that have the Route() function so that later it will be loop able to load.
Player
routers/player.go
package routers

import (
	"github.com/gin-gonic/gin"
	"github.com/arifluthfi16/game-matchmaking/controller"
)

type Player struct {}

func (p *Player) Route (route *gin.Engine){
	router := route.Group("/player")
	Controller := controller.PlayerController{}

	router.POST("/", Controller.CreatePlayer)
}
As you can see above, we implement the Route() function so that the this Player routers is implementing the RouterInterface this will apply to others route group as well.
Room
routers/room.go
package routers

import (
	"github.com/gin-gonic/gin"
	"github.com/arifluthfi16/game-matchmaking/controller"
)

type Room struct {}

func (p *Room) Route (route *gin.Engine){
	router := route.Group("/room")
	Controller := controller.RoomController{}

	router.POST("/", Controller.CreateRoom)
}
Match
routers/match.go
package routers

import (
	"github.com/gin-gonic/gin"
	"github.com/arifluthfi16/game-matchmaking/controller"
)

type Match struct {}

func (p *Match) Route (route *gin.Engine){
	router := route.Group("/match")
	Controller := controller.MatchController{}

	router.POST("/join", Controller.JoinMatch)
}
Route Loader
We will modify our /routers/index.go we will create a loader that will utilize the route that we have been created.
package routers

import "github.com/gin-gonic/gin"

type RouterInterface interface {
	Route(*gin.Engine)
}

type RouteLoader struct{}

func (loader RouteLoader) LoadRoutes() []RouterInterface {
	player 	:= new (Player)
	room 	:= new (Room)
	match 	:= new (Match)
	return []RouterInterface{
		player,
		room,
		match,
	}
}
The LoadRoutes() will initiate and return an array of the RouterInterface that will be processed later for creating routes.
Server Setup
Back to our main.go we will be do some tidying up and create a few modules to utilize our routes.
package main

import (
	"fmt"
	"github.com/arifluthfi16/game-matchmaking/routers"
	"github.com/arifluthfi16/game-matchmaking/services"
	"github.com/arifluthfi16/game-matchmaking/services/db"
	"github.com/gin-gonic/gin"
	"gorm.io/gorm"
)

type Server struct {
	db *gorm.DB
	Router *gin.Engine
}

func (server *Server) InitServer(){
	server.Router = gin.Default()
	var Router = routers.RouteLoader{}
	for _, routes := range Router.LoadRoutes(){
		routes.Route(server.Router)
	}
}

func (server *Server) InjectDB(){
	services.InjectDBIntoServices(server.db)
}

func (server *Server) Run(){
	fmt.Println("Rise and shine! 🌞🌞🌞")
	fmt.Println("Listening on port : 5050")
	server.Router.Run("127.0.0.1:5050")
}

func main(){
	DBConfig := db.DBConfig{
		DBHost: "localhost",
		DBUser: "postgres",
		DBName: "game_matchmaking",
		DBPort: "5432",
		DbPass: "<<your password>>",
	}
	app := Server{db: db.LoadDB(DBConfig)}
	app.InjectDB()
	app.InitServer()
	app.Run()
}
Here we split our process into different module, as you can see by separating our process we could get a clear main function. Final step will be testing our application. To run the application you simply in the root file.
go run main.go
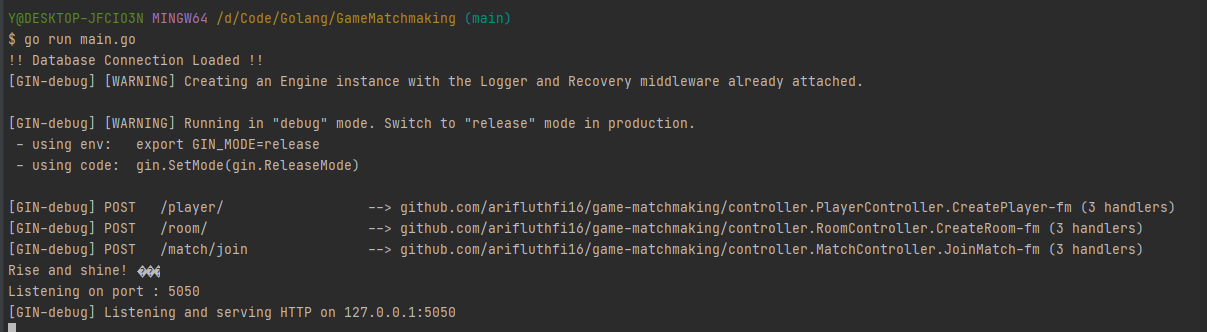
If there is no problem you should see output similar to this.
Testing the Endpoint
To test the endpoint i will be using Postman.
Create Player
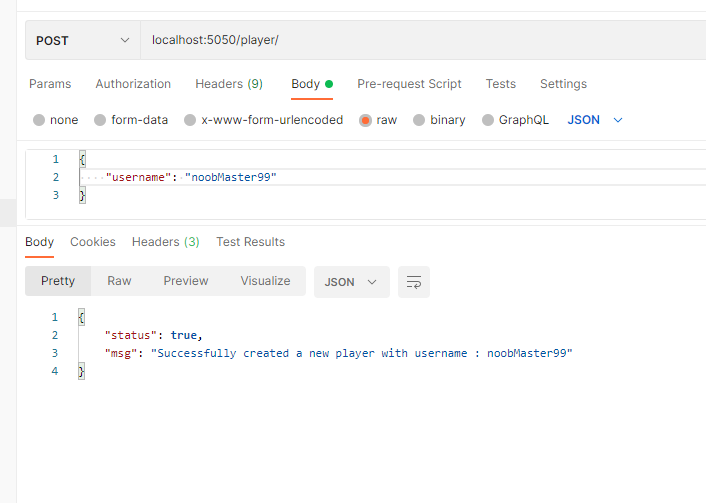
To test the create player we simply need to send parameter username to the endpoint [POST] localhost:5050/player/
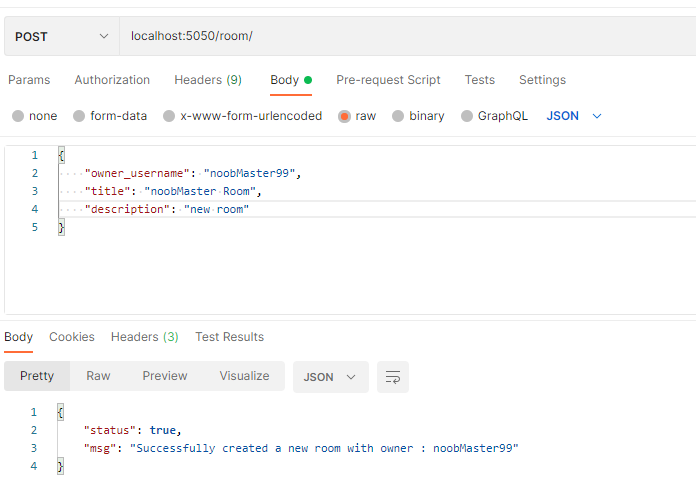
Create Room
Failed request example:

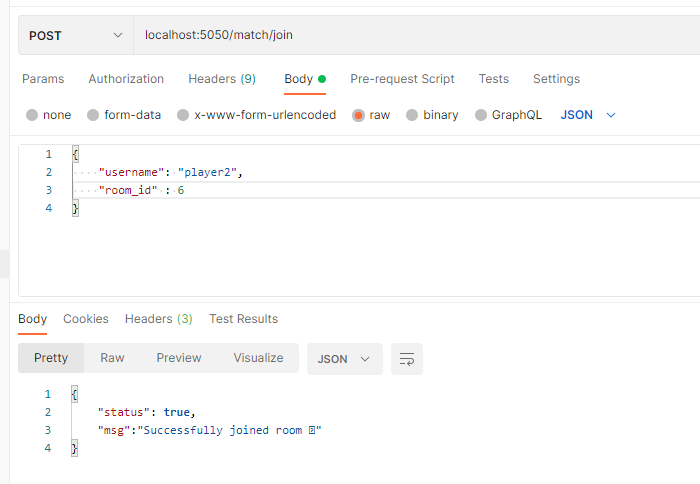
Match
Its done! finally! Do not forget to push your finished project to github!
Conclusion
Yes there are definitely a lot of modules and implementation that we can improve on, but for the sake of this project I wanted to focus on utilizing MVC and Service Layer pattern. I wanted to show how we can use MVC and Service layer to structure the project we are working on.
And as you can see by implementing those two methods we can produce a much cleaner and also more maintainable code, but still there is drawbacks such as there is a lot more package and modules that we need to define. But aside the extra modules that we need to create for a long term project it will be worth it.
In the next project we will dockerize a golang project and deploy it to google cloud!
Thanks a lot for reading this long article, any feedback will be very much appreciated! Thanks for reading!
Special Thanks
Special Thanks to Afi for supports during the writing process and debugging the pipeline. <3
Source Codes
You can find the source code of this article here https://github.com/arifluthfi16/game-matchmaking
More Sources
https://www.calhoun.io/using-mvc-to-structure-go-web-applications/
https://softwareengineering.stackexchange.com/questions/211688/use-a-service-layer-with-mvc
https://stackoverflow.com/questions/31180816/mvc-design-pattern-service-layer-purpose
https://medium.com/stackavenue/why-to-use-service-layer-in-spring-mvc-5f4fc52643c0